|
|
Post by Brian on Sept 1, 2018 22:59:50 GMT -5
I've won the battle, but not the war......
 I've closely inspected every thing and everything that was visible looks good...no air pockets. Cut a pour gate and air vent in the half on the Left. Hopefully I'll get some resin poured tomorrow (9-2-18)...would really like to get this one behind me and be able to hand the mold off to Tony after all this time. |
|
|
|
Post by Brian on Sept 2, 2018 21:29:11 GMT -5
...poured the resin....RC-3 .....still having a minor issue with the mold 

There was an issue with flow to the lower portion of the stair steps....other than that , the pull looks decent. What I am going to do is cut a channel from the pour gate to the lower portion of the adjacent stairs and a channel from the air vent to the lower portion of the adjacent stairs on that side as well to increase resin flow to those areas. I will also increase the size of the air vent since it needs to move more resin and vacate more air. |
|
|
|
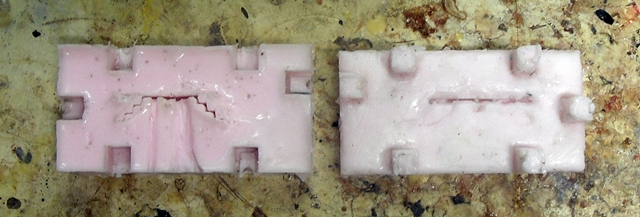
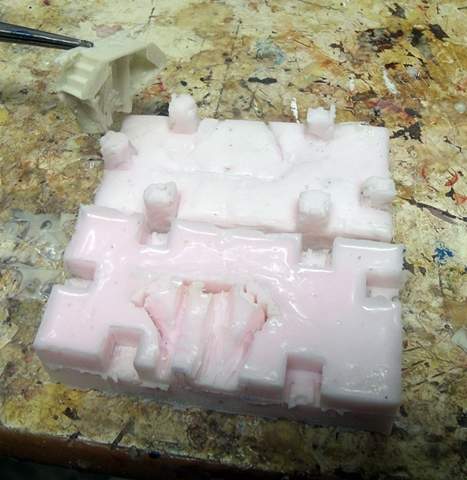
Post by Brian on Jan 20, 2019 22:18:41 GMT -5
SUCCESS AT LAST!  Using the LEGO mold box this time I made a 2 part mold that turned out great. After the 2 parts were poured, I cut the pour gates and vents. I figured that I had plenty of vents, but after the first couple of pours with the new mold , I kept coming up with evidence of air pockets in the resin cast. So what I did was to cut more venting in the area of the air pockets and pour again. It took about 4 or 5 resin pours before the issue was resolved. Another issue that I found was that the really old part "B" side resin that I have been using pours a bit thicker than the new part "B"....There are some really thin parts of this rail car platform that it just seemed like there just wasn't enough flow of resin to those areas.....made a couple of pours with the new part "B" with no problems other than a persistent air pocket a little bit larger than a pin head. The really old part "B" still works fine in my 1 part molds and the larger sized 2 part molds where the pieces are thicker.
I'm going to pour this mold every time that I pour any other molds so as not to waste any excess resin that gets mixed. |
|
|
|
Post by notoes on Jan 25, 2019 20:31:51 GMT -5
Hooray for keeping at something until you get it working right. Thanks for keeping us informed, it always helps to have seen what others have done successfully and to learn from what doesn't work for them.
|
|
|
|
Post by Brian on Jan 26, 2019 22:34:23 GMT -5
Thanks ....the mold has been finished for a while, but it took some finessing to rid it of the air pockets. I think I counted 6 or 7 wasted pours until I had it vented correctly.
Seems like my side projects where starting to develop into other side projects and I wanted to get this one wrapped up before it would land on the back burner.
|
|
|
|
Post by notoes on Jan 27, 2019 8:52:01 GMT -5
With something that small, I'd cut the wasted ones up to make them into "filler" for larger castings. I've done it and it works just fine. Nothing wrong with being sure things get done, I've let a few things hit the backburner and they've sat there for a year or so and it drives me a bit nuts that I let them go that long.
|
|
|
|
Post by Brian on Jan 27, 2019 19:11:42 GMT -5
With something that small, I'd cut the wasted ones up to make them into "filler" for larger castings. I've done it and it works just fine...... I'd like to see how you do that. I tried that once and had less than desirable results...I don't know if my casting was too small or if the ground up resin chunks were still too large. I've got some larger (for me at least) resin pours on the not too distant horizon that I'd like to try this on. |
|
|
|
Post by notoes on Jan 30, 2019 20:08:11 GMT -5
I just use a pair of line pliers like what you'd use to cut the flashing off with. Though some are too solid to cut sometimes. Since most of mine are already small, there are a lot of thin areas - think 1/4" or so. It helps to have them as small as possible without being ground up and then add them to a new pour of something larger. Though considering how much some of them hurt my hands after trying to cut some, I'd love to find a better way of doing it.
|
|
|
|
Post by Brian on Jan 30, 2019 22:17:19 GMT -5
O.k lets see if I understand this correctly...
Resin can be broke up or ground up and added to a rubber mold prior to pouring resin much the same way RTV rubber pieces can be added to RTV Silicone to make a rubber mold or in other words the poured resin will adhere to the broke up or ground up resin to make a complete resin cast...am I right? |
|
|
|
Post by notoes on Jan 31, 2019 7:41:04 GMT -5
Yes that's right. I've added broken up resin to new resin with good results. I've got a picture to show of it - these two castings are made of a combo of RC-3 Tan and RC-3 White so you can clearly see the broken up pieces. Or the large flat circle in the case of the left one. You've just got to make sure the new resin coats the mold first or add the broken pieces in after pouring the new. That way the new resin encases the old and you get a new casting with all the detailing you wanted while recycling castings that would otherwise be tossed. Now the new casting does need to be bigger than the chunks you're adding or it won't work so maybe that's what you had go wrong,
 |
|
|
|
Post by Brian on Feb 1, 2019 21:14:57 GMT -5
Looks like this works best with a 1 part mold and larger cast than what I've been doing so far. I've got a couple of car frame/floor pan combos that I need to get molds made for and casted....might have to give this a try then. My concern is the resin starting to set up before I get done with the pour since now I would either be coating the mold or adding the broken up pieces to the pour. Do you think it could be possible that if the broken up pieces where reduced down to something the size of a grain of Salt, that it could be added to the mix (part "A" and part "B") just prior to the aprox. 30 second mix process instead of as you described so as to afford every possible second needed in the work time.
Now I need to come up with something like a hammer mill to reduce the resin chunks down to something useable.
|
|
|
|
Post by notoes on Feb 5, 2019 7:54:08 GMT -5
That small one on the right is a 1"x1" casting, the larger one just happened to not be broken down and I just happened to need a single large cast I could add it to. But yeah I usually use 1 part molds with this. The broken up pieces possibly could be added to the mix if they are small enough. Most times I add mine in to the mold before I mix both sides and then tap the mold or even poke it a bit with the stirring stick to get the bubbles out (or at least to where they don't show up in the design). Since mine are small I've even added some right after I pour but the trick to that is to have them already cut up and sitting right next to the molds. If you come up with something to reduce them other than using line pliers, I'd love to know - I've got some large chunks I'd love to break down but don't want to hurt my hands more than I already do with the smaller ones.
|
|
|
|
Post by Brian on Feb 5, 2019 20:26:02 GMT -5
...........If you come up with something to reduce them other than using line pliers, I'd love to know - I've got some large chunks I'd love to break down but don't want to hurt my hands more than I already do with the smaller ones. Actually I ran this past my wife Amy as she is just enough removed from the rubber-n-resin stuff that she is able to provide me with a different insight.  She came up with the simply brilliant idea of using an electric coffee grinder....I handed her a chunk of resin to check out and she concluded that a coffee bean and a smaller chunk of resin would be about the same consistency and hardness. I'm not going to rush out and buy one just yet....maybe score a used one at a garage sale or something for a few bucks this Spring. Another possibility might be a blender.....after all there used to make smoothies out of ice cubes.
|
|
|
|
Post by notoes on Feb 6, 2019 13:56:36 GMT -5
...You know, I've seen blenders used to reduce the size of plastic chunks... it seriously could work! Tell her great idea! I grind my own coffee beans and actually have two but the old one is one I use for grinding up my herbs (I have five kinds of mint and three kinds of basil and I keep adding more herbs) so I can't use the old one but I've seen mine really chew up some beans really fast. We've got a doctor appointment next month, I might see if I can find a blender or grinder at the ReStore place (we've been looking for a very old style of French doors we can't find otherwise). I think I saw some small appliances there before, I think even a mini chopper might work too. If they work, it would definitely save my hands.
|
|


